Requests接口自动化
学习目标
- 了解Requests库
- 掌握发送Get请求、Post请求
- 掌握请求头设置
- 掌握获取响应内容
- 掌握cookie管理
- 掌握session会话管理
- 完成接口自动化练习
1. 什么是Requests库
Requests库是用Python编写的,基于urllib,采用Apache2 Licensed开源协议的HTTP库;相比urllib库,Requests库更加方便,可以节约我们大量的工作,完全满足HTTP测试需求
2. 安装Requests库:
- 方式一:文件→设置→解释器→【+】,搜索requests
- 方式二:终端命令运行安装pip install requests
3. 发送Get请求
以“轻商城”的“搜索商品接口为例:
import requests

# 方式一:参数直接定义在URL中
response_1 = requests.get("http://www.litemall360.com:8080/wx/goods/list?keyword=笔记本&page=1&limit=10&categoryId=0")

# 方式二:传递字符串类型的参数
response_2 = requests.get("http://www.litemall360.com:8080/wx/goods/list", params="keyword=笔记本&page=1&limit=10&categoryId=0")

# 方式三:传递字典类型的参数
response_3 = requests.get("http://www.litemall360.com:8080/wx/goods/list", params={"keyword": "笔记本", "page":1, "limit":0, "categoryId":0})

# 获取响应结果
print("响应结果", response_1.text)
4. 发送Post请求+data表单传参
以“宠物医院”项目的“登录”接口为例:
import requests

# 准备数据
data = {"username": "admin", "password": "123456"}

# 发送post请求
response = requests.post("http://localhost:8082/login", data=data)

# 获取响应结果
print("响应结果", response.text)
5. 发送Post请求+json传参
以“轻商城”项目的“登录”接口为例:
import requests

# 准备数据
data = {"username": "user123", "password": "user123"}

# 发送post请求
response = requests.post("http://www.litemall360.com:8080/wx/auth/login", json=data)

# 获取响应结果
print("响应结果", response.text)
6. 发送请求时,带请求头
如果需要为请求添加请求头数据,只需要传递一个字典类型的数据给 headers 参数就可以了
以“轻商城”项目的“加入购物车”接口为例:
import requests

# 准备数据
data = {"goodsId":1057036,"number":1,"productId":71}

# 准备请求头
headers = {"Content-Type": "application/json;charset=UTF-8",
           "X-Litemall-Token": "eyJhbGciOiJIUzI1NiIsInR5cCI6IkpXVCJ9.eyJzdWIiOiJ0aGlzIGlzIGxpdGVtYWxsIHRva2VuIiwiYXVkIjoiTUlOSUFQUCIsImlzcyI6IkxJVEVNQUxMIiwiZXhwIjoxNjgwNDk5NTUyLCJ1c2VySWQiOjEyMywiaWF0IjoxNjgwNDkyMzUyfQ.N1mM_l6Frb23odCKOk0YqWOT-6cx0tnAcRhOpJrj45Q"}

# 发送post请求
response = requests.post("http://www.litemall360.com:8080/wx/cart/add", json=data, headers=headers)

# 获取响应结果
print("响应结果", response.text)
7. 获取响应信息
请求方法的返回值response为 Response 对象,我们可以从这个对象中获取所有我们想要的响应信息
- response.status_code:状态码
- response.url:请求url
- response.encoding:查看响应头部字符编码
- response.headers:响应头信息
- response.cookies:cookie信息
- response.text:文本形式的响应内容
- response.content:字节形式的响应内容
- response.json():JSON形式的响应内容
以“宠物医院”项目的“登录”接口为例:
import requests

# 准备数据
data = {"username": "admin", "password": "123456"}

# 发送post请求
response = requests.post("http://localhost:8082/login", data=data)

# 获取响应
print("状态码", response.status_code)
print("url", response.url)
print("响应头部字符编码", response.encoding)
print("响应头信息", response.headers)
print("cookie信息", response.cookies)
print("文本形式的响应内容", response.text)
print("字节形式的响应内容", response.content)
print("JSON形式的响应内容", response.json())
1. 请求中加入cookie
从上个接口的响应中,提取cookie,再传入下个请求:
response = requests.post("请求URL地址")
cookies = response.cookies
response_2 = requests.post("请求URL地址", cookies=cookie)
可以将cookie写成字典,传入请求中
requests.post("请求URL地址", cookies={"key": "value"})
以“宠物医院”项目的“登录”后“获取宠物列表”接口为例:
import requests

# 准备登录接口数据
data = {"username": "admin", "password": "123456"}

# 发送post请求
response = requests.post("http://localhost:8082/login", data=data)

# 获取登录接口返回的cookie
cookie = response.cookies

# 准备获取宠物接口数据
data2 = {"name": "", "page": 1, "limit": 10}

# 发送post请求
response2 = requests.post("http://localhost:8082/user/pet/getAllByLimit", data=data2, cookies=cookie)

print("响应:", response2.text)
9. session的作用
session对象代表一次用户会话:从客户端浏览器连接服务器开始,到客户端浏览器与服务器断开会话能让我们在跨请求时候保持某些参数, 比如在同一个 session 实例发出的所有请求之间保持cookie。不需要额外再传cookie。
10. 创建session对象
session = requests.Session() # 得到session对象后,就可以调用该对象中的方法来发送请求
以宠物医院的“登录”后请求“获取宠物列表”接口为例:
import requests

session = requests.session()    # 获取session对象

# 准备登录接口数据
data = {"username": "admin", "password": "123456"}

# 通过session对象发送登录接口
response = session.post("http://localhost:8082/login", data=data)

# 准备获取宠物接口数据
data2 = {"name": "", "page": 1, "limit": 10}

# 通过session对象发送获取宠物列表接口
response2 = session.post("http://localhost:8082/user/pet/getAllByLimit", data=data2)

print("响应:", response2.text)
接口自动化项目练习:
- 项目:宠物医院
- 单一接口:登录
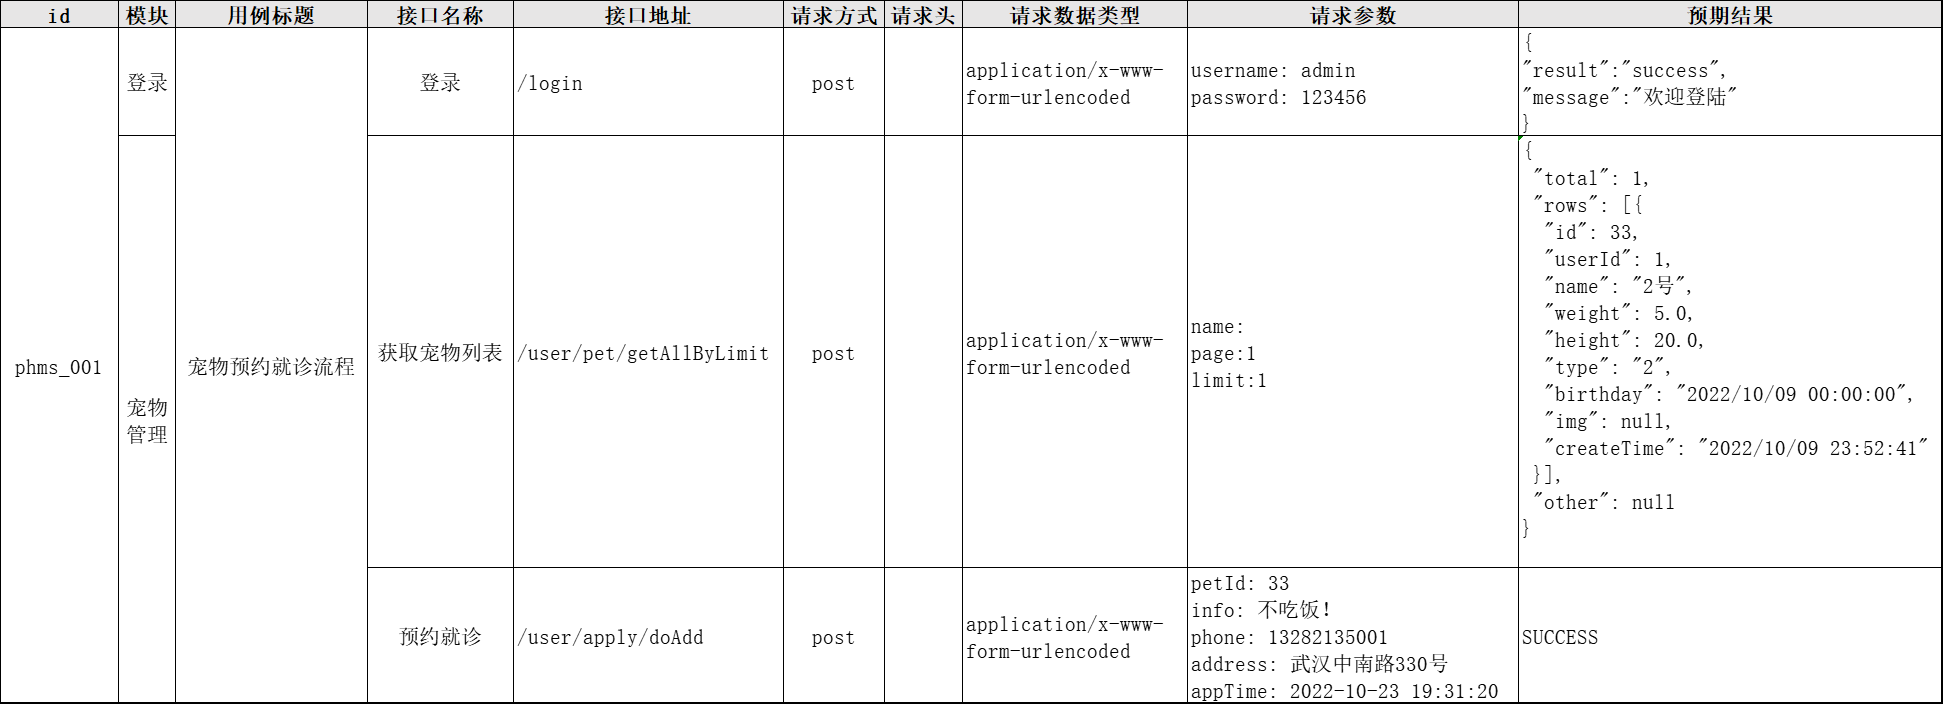
- 多接口场景:登录→查询宠物→预约就诊
2. 接口信息如下:
① 登录
请求方式: POST
路径: http://localhost:8080/login
请求头:Content-Type: application/x-www-form-urlencoded
请求参数:
	username: admin
	password: 123456

响应案例:
	{
 	 "result": "success",
 	 "message": "欢迎登陆"
	}
② 获取宠物列表
请求方式: POST
路径:  http://localhost:8080/user/pet/getAllByLimit
请求头:Content-Type: application/x-www-form-urlencoded
请求参数:
    name:
    page:1
    limit:10

响应案例:
{
	"total": 1,
	"rows": [{
		"page": null,
		"pageSize": null,
		"sort": null,
		"order": null,
		"rows": null,
		"limit": null,
		"fromNum": null,
		"id": 33,
		"userId": 1,
		"name": "2号",
		"weight": 5.0,
		"height": 20.0,
		"type": "2",
		"birthday": "2022/10/09 00:00:00",
		"img": null,
		"createTime": "2022/10/09 23:52:41"
	}],
	"other": null
}
③ 申请预约就诊
请求方式: POST
路径:   http://localhost:8080/user/apply/doAdd
请求头:Content-Type: application/x-www-form-urlencoded
请求参数:
    petId: 33
    info: 不吃饭!
    phone: 13282135001
    address: 武汉中南路330号
    appTime: 2022-10-23 19:31:20

响应案例:
SUCCESS
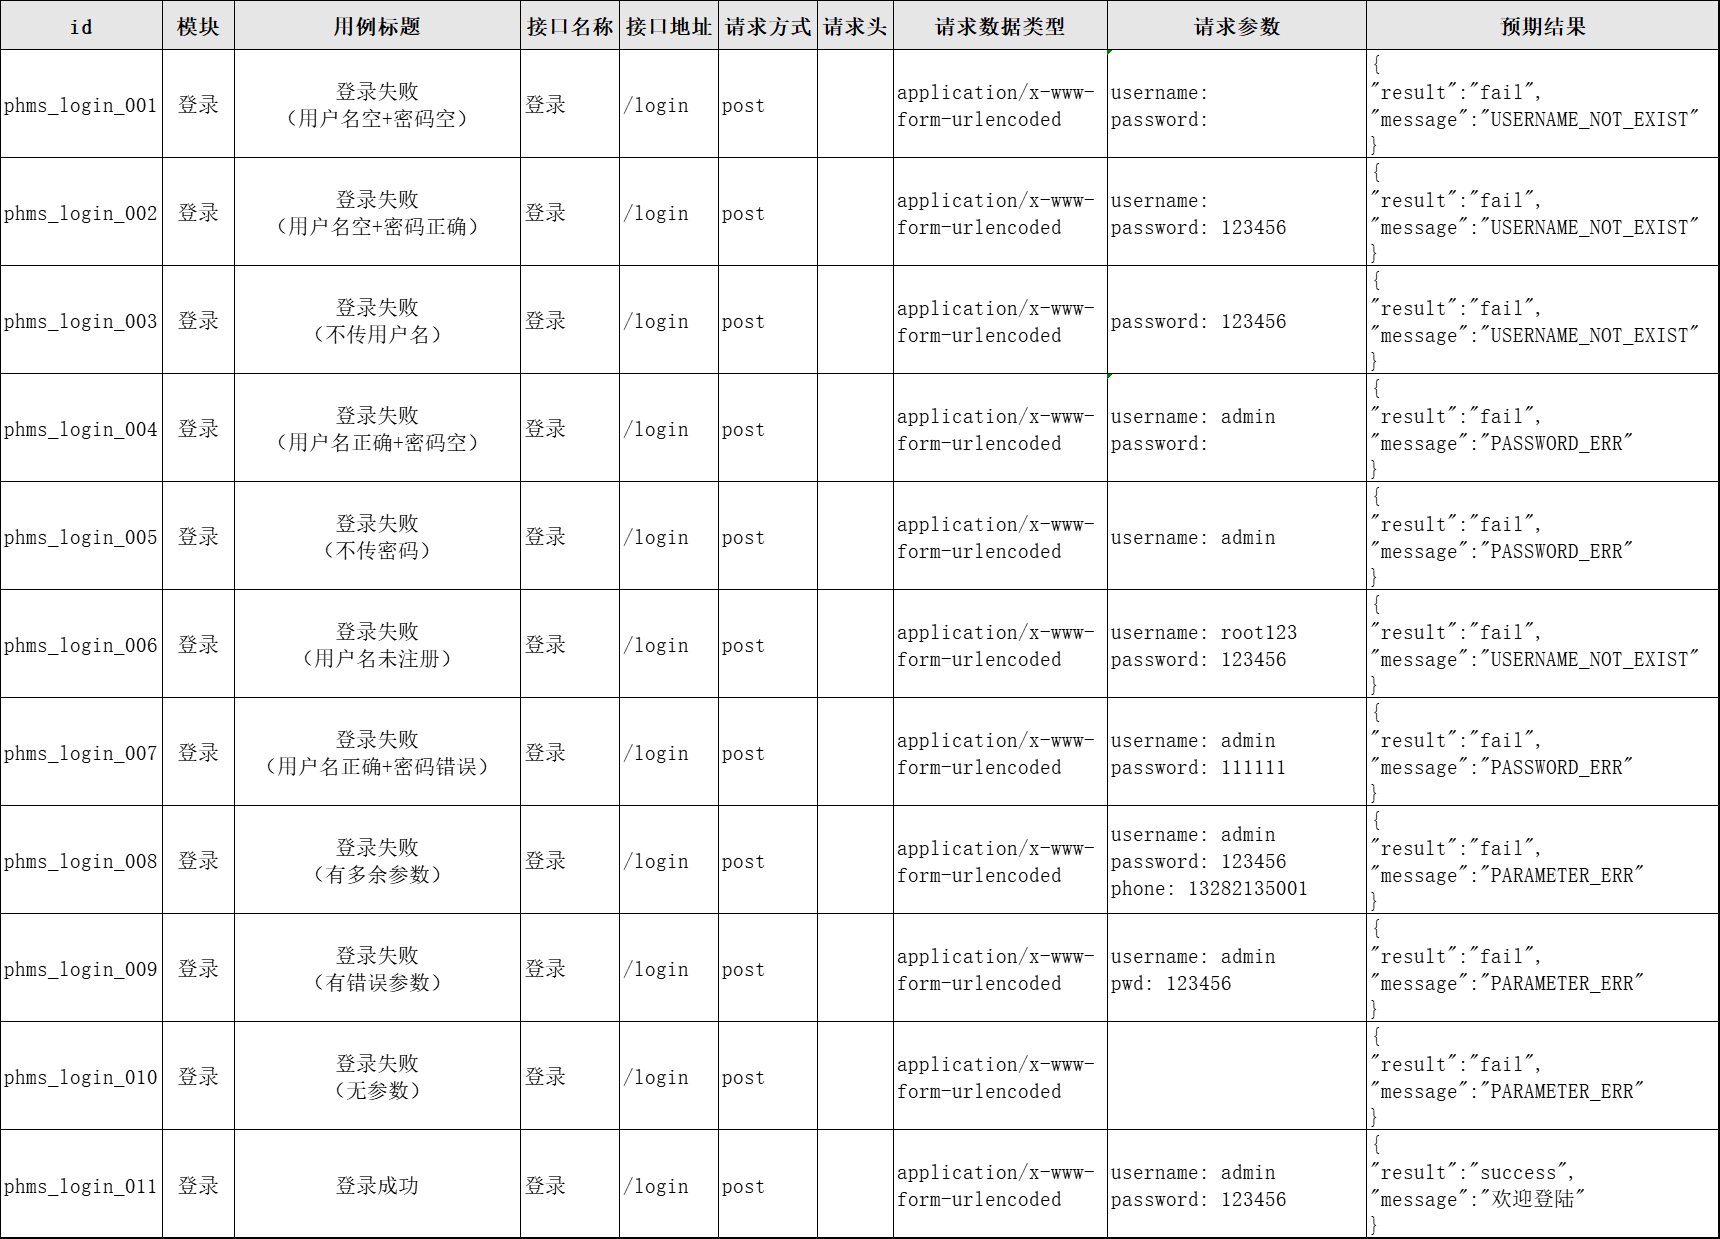
3. 编写登录接口测试用例:
4. 编写流程接口测试用例:
参考代码:
1. 项目结构:
- api软件包:用于api管理
- data目录:用户单一接口测试数据管理
- report目录:用于存放测试报告
- testCase软件包:用于存放测试脚本
- app.py文件:配置变量管理
- pytest.ini配置文件
- Utils.py工具包
2. app.py增加配置内容:
BASE_URL = 'http://localhost:8082'
3. Utils工具包新增ApiAssert类:
class ApiAssert:
    @classmethod
    def common_assert(cls, response, assert_data):
        '''
        常规断言(要求响应结果中有result和message两个属性)
        :param response: 响应包
        :param assert_data: 预期结果
        :return:
        '''
        print(response.text)
        assert response.status_code == assert_data.get("status_code")
        assert response.json().get("result") == assert_data.get("result")
        assert response.json().get("message") == assert_data.get("message")

    @classmethod
    def include_assert(cls, response, assert_data):
        '''
        包含断言(关键数据是否存在于响应体中)
        :param response:响应包
        :param assert_data: 需要断言的关键数据
        :return:
        '''
        print(response)
        assert response.status_code == 200
        assert assert_data in response.text
4. api层
创建两个py文件,loginApi.py(用于管理登录接口)、reservationApi.py(用于管理预约流程涉及的接口)
① loginApi.py
import app
import requests

class LoginApi:
    def __init__(self):
        self.login_url = app.BASE_URL+"/login"

    def login(self, login_data):
        return requests.post(url=self.login_url, data=login_data)
② reservationApi.py
import app
import requests

class ReservationApi:
    def __init__(self):
        self.login_url = app.BASE_URL+"/login"
        self.getAllByLimit_url = app.BASE_URL+"/user/pet/getAllByLimit"
        self.doAdd_url = app.BASE_URL+"/user/apply/doAdd"
        self.session = requests.session()

    def login(self, data):
        return self.session.post(url=self.login_url, data=data)

    def getAllByLimit(self, data):
        return self.session.post(url=self.getAllByLimit_url, data=data)

    def doAdd(self, data):
        return self.session.post(url=self.doAdd_url, data=data)
5. testCase层
创建两个py文件,TestLogin.py(登录接口测试用例脚本)、TestReservation.py(预约流程测试用例脚本)
① TestLogin.py
import pytest
from Utils import *
from api.loginApi import LoginApi

class TestLogin:
    def setup_class(self):
        self.login = LoginApi()

    def setup(self):
        pass

    # 登录
    @pytest.mark.parametrize(("id", "data", "assert_data"),UtilsFileData.build_data_object(r'./data/loginData.json'))
    def test_login_001(self, id, data, assert_data):
        print("用例编号:", id)
        response = self.login.login(data)
        ApiAssert.common_assert(response,assert_data)


    def teardown(self):
        pass

    def teardown_class(self):
        pass
② TestReservation.py
import pytest
from Utils import *
from api.reservationApi import ReservationApi


class TestReservation:
    def setup_class(self):
        self.reservation = ReservationApi()
        self.__petId = 0

    def setup(self):
        pass

    def test_phms_001_login(self):
        data = {
            "username": "admin",
            "password": "123456"
        }
        response = self.reservation.login(data)
        ApiAssert.include_assert(response, "欢迎登陆")

    def test_phms_001_getAllByLimit(self):
        data = {
            "name": "",
            "page": 1,
            "limit": 1
        }
        response = self.reservation.getAllByLimit(data)
        ApiAssert.include_assert(response, 'total')
        self.__petId = response.json().get("rows")[0].get("id")

    def test_phms_001_doAdd(self):
        data = {
            "petId": self.__petId,
            "info": "不吃饭!",
            "phone": "13282135001",
            "address": "武汉中南路330号",
            "appTime": "2022-10-23 19:31:20"
        }
        response = self.reservation.doAdd(data)
        ApiAssert.include_assert(response, 'SUCCESS')

    def teardown(self):
        pass

    def teardown_class(self):
        pass
6. data层
创建一个loginData.json文件,用于管理登录接口测试用例所需的测试数据
[
  {
    "id": "phms_login_001",
    "data": {
      "username": "",
      "password": ""
    },
    "assert_data": {
      "status_code": 200,
      "result": "fail",
      "message": "USERNAME_NOT_EXIST"
    }
  },{
    "id": "phms_login_002",
    "data": {
      "username": "",
      "password": "123456"
    },
    "assert_data": {
      "status_code": 200,
      "result": "fail",
      "message": "USERNAME_NOT_EXIST"
    }
  },{
    "id": "phms_login_003",
    "data": {
      "password": "123456"
    },
    "assert_data": {
      "status_code": 200,
      "result": "fail",
      "message": "USERNAME_NOT_EXIST"
    }
  },{
    "id": "phms_login_004",
    "data": {
      "username": "admin",
      "password": ""
    },
    "assert_data": {
      "status_code": 200,
      "result": "fail",
      "message": "PASSWORD_ERR"
    }
  },{
    "id": "phms_login_005",
    "data": {
      "username": "admin"
    },
    "assert_data": {
      "status_code": 200,
      "result": "fail",
      "message": "PASSWORD_ERR"
    }
  },{
    "id": "phms_login_006",
    "data": {
      "username": "root123",
      "password": "123456"
    },
    "assert_data": {
      "status_code": 200,
      "result": "fail",
      "message": "USERNAME_NOT_EXIST"
    }
  },{
    "id": "phms_login_007",
    "data": {
      "username": "admin",
      "password": "111111"
    },
    "assert_data": {
      "status_code": 200,
      "result": "fail",
      "message": "PASSWORD_ERR"
    }
  },{
    "id": "phms_login_008",
    "data": {
      "username": "admin",
      "password": "123456",
      "phone": "13282135001"
    },
    "assert_data": {
      "status_code": 200,
      "result": "fail",
      "message": "PARAMETER_ERR"
    }
  },{
    "id": "phms_login_009",
    "data": {
      "username": "admin",
      "pwd": "123456"
    },
    "assert_data": {
      "status_code": 200,
      "result": "fail",
      "message": "PARAMETER_ERR"
    }
  },{
    "id": "phms_login_010",
    "data": {},
    "assert_data": {
      "status_code": 200,
      "result": "fail",
      "message": "PARAMETER_ERR"
    }
  },{
    "id": "phms_login_011",
    "data": {
      "username": "admin",
      "password": "123456"
    },
    "assert_data": {
      "status_code": 200,
      "result": "success",
      "message": "欢迎登陆"
    }
  }
]
7. pytest.ini
[pytest]
addopts = -s -v --html=report/report.html --reruns 3
testpaths = ./testCase
python_files = Test*.py
python_classes = Test*
python_functions = test*